4-Step DIY Pallet Chicken Coop: Build It Cheap and Strong

Building a chicken coop from wooden pallets is one of the most satisfying and budget-friendly projects in backyard chicken keeping. Pallets are sturdy, widely available, and often free, which means you can build a solid, attractive coop for a fraction of the cost of a store-bought kit. The trick is knowing how to select, prepare, and assemble pallets the right way so your coop ends up safe, weatherproof, and predator-resistant.
In this guide, we will walk through a simple four-step process to build a DIY pallet chicken coop, along with the hardware and materials that turn a stack of pallets into a coop your flock will love. No advanced carpentry skills required. If you can use a drill and a saw, you can build this.
Why Build a Coop from Pallets?
Pallets offer a rare combination of strength, availability, and low cost. Made from solid hardwood or pine and engineered to carry heavy loads, a single pallet already forms a ready-made wall or floor frame.
Many businesses give away spare pallets for free, so your main expenses become hardware, fencing, and roofing. Beyond the savings, building your own coop lets you size it exactly to your flock and yard, and there is real pride in housing your hens in something you built with your own hands.
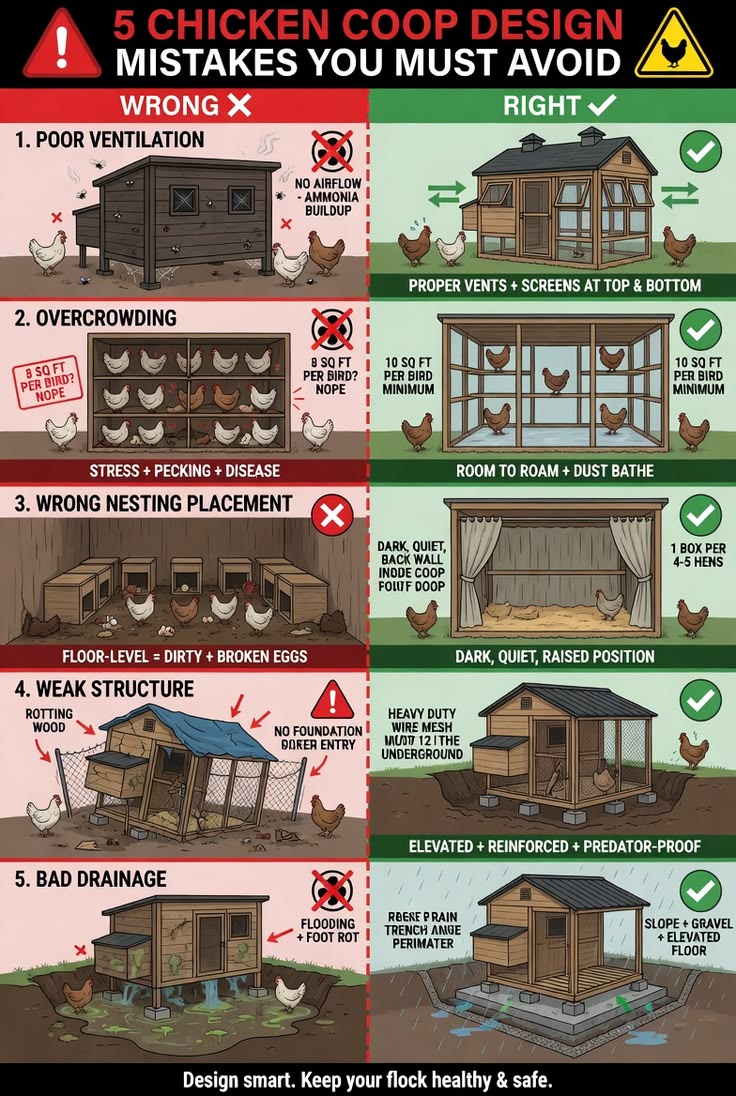
Pallets do come with a couple of cautions. Always choose safe, untreated pallets, and plan to seal gaps and reinforce against predators. Handle those two issues well and pallets make an excellent coop material.

Choosing Safe Pallets
Before you build, learn to read the stamp on each pallet. Look for the letters HT, which means the wood was heat-treated and is safe to use. Avoid any pallet stamped MB, which indicates treatment with methyl bromide, a toxic chemical you do not want near your birds. Pick pallets that are clean, dry, free of oil or chemical stains, and structurally sound with no rot or major cracks. Gathering eight to twelve good pallets gives you enough for a small to medium coop.
Essential Tool: Cordless Drill and Screw Set
A good cordless drill and a box of exterior screws are the backbone of any pallet build, letting you fasten frames quickly and securely.
Tools and Materials You Will Need
Gather your supplies before you start so the build flows smoothly. You will need eight to twelve heat-treated pallets, a cordless drill, exterior wood screws, a hand saw or circular saw, a hammer and pry bar for breaking down extra pallets into boards, half-inch hardware cloth for windows and gaps, roofing material such as metal panels or shingles, hinges and a secure latch for the door, and exterior paint or wood sealer to weatherproof the finished coop.
A staple gun with washers or fencing screws helps attach the hardware cloth firmly.
Hardware Cloth and Latches
Half-inch hardware cloth seals the gaps between pallet slats against predators, and a locking latch secures the door against clever raccoons.
Step 1: Build the Base and Floor
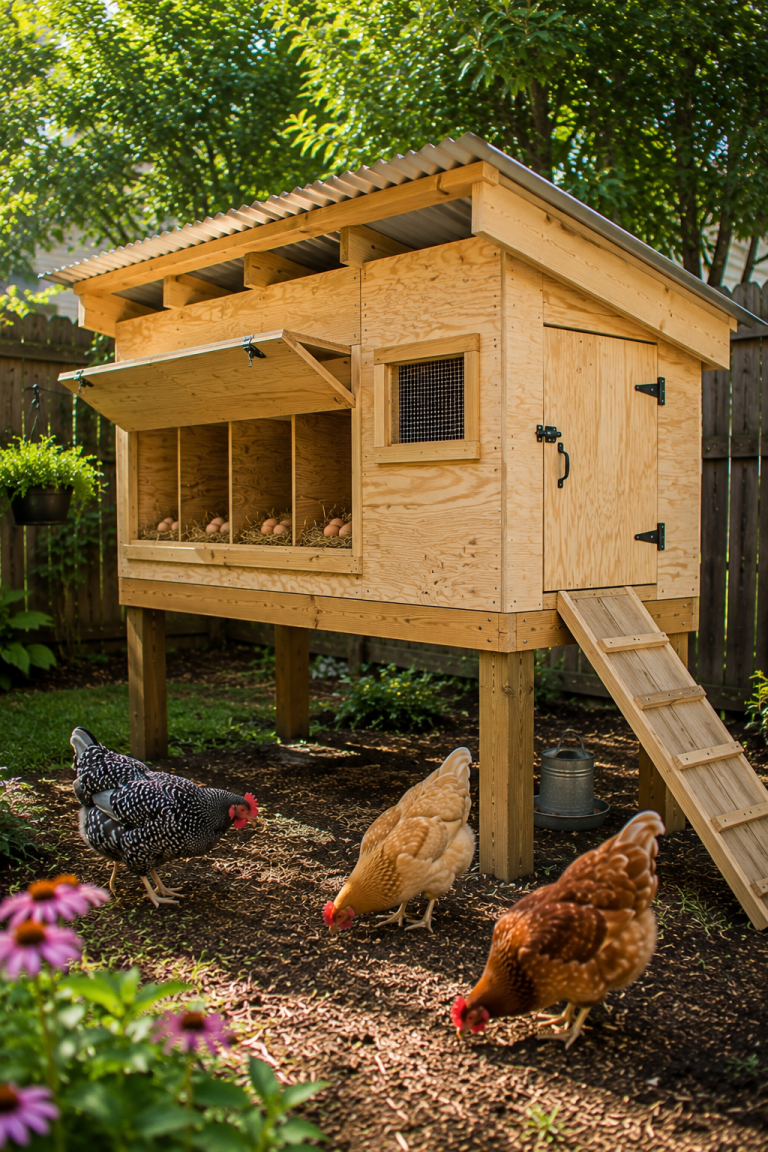
Start with a level, well-drained spot in your yard. Lay two or three pallets flat to form the floor, screwing them together at the edges so they cannot shift. For a raised coop, set this floor frame on concrete blocks or short legs to lift it off the ground, which improves drainage and keeps rodents from nesting underneath.
Cover the top of the pallet floor with a sheet of exterior plywood so droppings and bedding do not fall through the slats, and seal the seams. A solid, level base is the foundation everything else relies on, so take your time here.
Step 2: Raise and Secure the Walls
Stand pallets upright around the perimeter of your floor to form the four walls, leaving a gap on one side for the door. Screw each wall pallet firmly to the floor base and to its neighboring walls at the corners, using long exterior screws and metal corner brackets for extra strength.
Check that everything is square and plumb as you go. Pallet walls already include built-in framing, so once they are fastened together the structure becomes remarkably rigid. Leave openings where you want windows or vents, which you will cover with hardware cloth later.
Corner Brackets and Exterior Screws
Metal corner brackets and weather-rated screws lock your pallet walls together into a solid, wind-resistant frame that lasts for years.
Step 3: Add the Roof, Door, and Ventilation
Frame a simple sloped roof so rain and snow run off rather than pooling. Lay rafters across the top of the walls, then attach metal roofing panels or shingles over a plywood deck, allowing a slight overhang to shed water away from the walls. Build a door from a smaller pallet or a plywood panel, hang it on heavy-duty hinges, and fit a secure locking latch.
Cut your ventilation high on at least two walls near the roofline, and cover every window, vent, and gap between pallet slats with half-inch hardware cloth, screwed down with washers. This step is where your coop becomes weatherproof and predator-resistant.
Step 4: Fit Out the Interior and Weatherproof
Now make it livable. Install a roosting bar from a length of 2×4 laid flat side up, mounted higher than the nesting boxes. Add one or two nesting boxes in a quiet, dark corner, which you can build from leftover pallet wood or drop in a ready-made box. Fill the floor with a thick layer of pine shavings using the deep litter method.
Finally, seal and protect all that bare wood with exterior paint or a wood sealer, paying attention to seams and end grain. Weatherproofing is what takes your coop from a rough shelter to a durable, long-lasting home.
Nesting Boxes and Roost Hardware
Drop-in nesting boxes and roost brackets finish the interior fast, giving your hens a comfortable place to lay and sleep right away.
Finishing Touches and Predator Proofing
Before you move your flock in, do a final safety pass. Lay a flat apron of hardware cloth on the ground around the base, or bury it a foot deep, to stop diggers. Double-check that every gap between slats is sealed, since weasels and rats exploit even small openings.
Add a secure run attached to the door if your birds will not free-range. For ultimate overnight protection, fit an automatic door that locks at dusk. These finishing details turn a cheap pallet build into a coop as safe as any store-bought model.
Automatic Coop Door
Adding an automatic door to your pallet coop gives it the same hands-free overnight security as premium kits, for a small upgrade cost.
Estimating Your Pallet Coop Costs
The biggest appeal of a pallet coop is how little it costs, but you should still budget for the parts you cannot scavenge. The pallets themselves are often free from local businesses, garden centers, or hardware stores that have spares.
Your real spending goes toward hardware cloth for predator proofing, exterior screws and corner brackets, roofing material, hinges and a locking latch, and paint or sealer to weatherproof the wood. Many builders complete a solid small coop for a modest fraction of what an equivalent store-bought model would cost.
If you want to add an automatic door or ready-made nesting boxes, factor those in separately. Even with those upgrades, a pallet coop remains one of the most economical ways to house a flock well.
Adding a Run to Your Pallet Coop
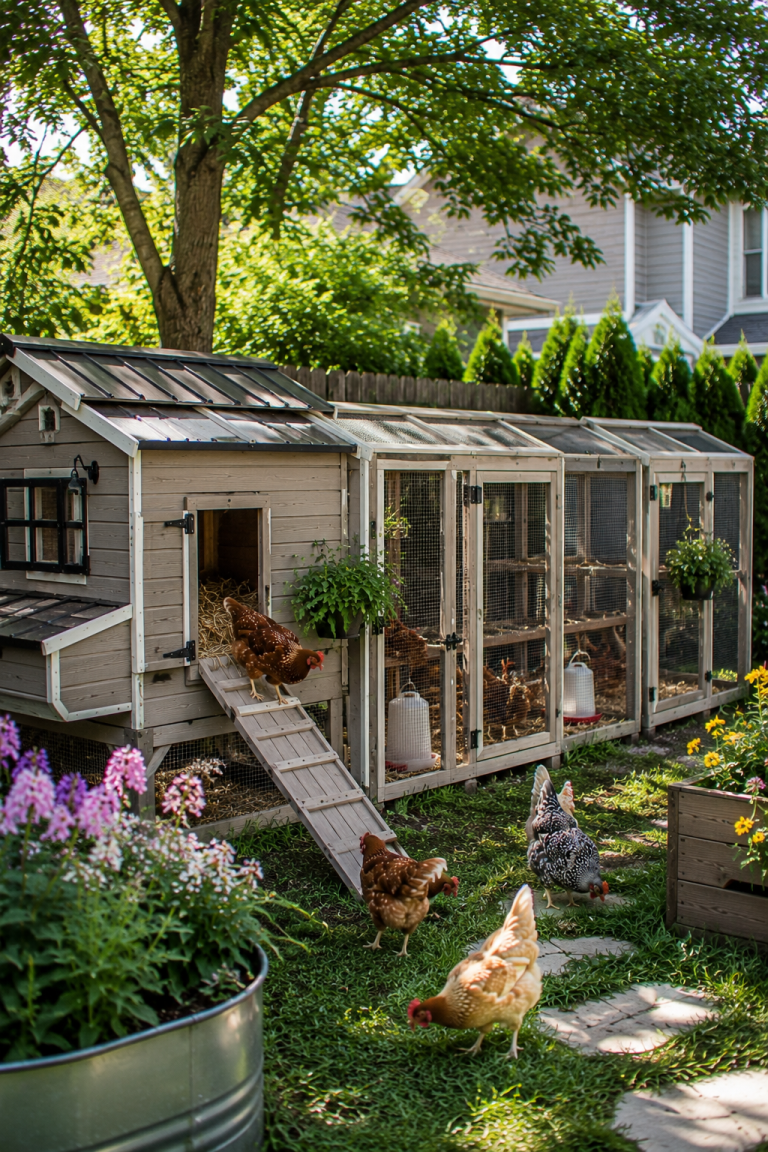
Unless your birds are free-range all day, you will want a secure run attached to your pallet coop. You can frame one easily from additional pallet wood broken down into posts and rails, or from inexpensive lumber, then wrap the entire frame in half-inch hardware cloth, including the top, to keep out hawks and climbers.
Attach the run directly to the coop door so birds can move freely between the two. Lay a hardware cloth apron flat around the run base, or bury it, to stop diggers. A simple gate with a locking latch lets you enter to clean and collect. With a run in place, your pallet coop becomes a complete, safe home where your flock can scratch and forage in the open without risk.
Pallet Coop Care and Longevity
With proper care, a pallet coop can last many years, rivaling far more expensive builds. The key is protecting the wood from moisture, which is the main enemy of any wooden structure. Reapply exterior paint or sealer every couple of years, paying special attention to the roof edges, ground contact points, and end grain where water soaks in fastest.
Keep the coop raised off the ground or on blocks so the base stays dry. Inspect the structure each season for loose screws, shifting joints, or any new gaps that have opened as the wood dries, and tighten or seal them promptly. Because pallets are built from tough, load-bearing lumber, a well-maintained pallet coop stays sturdy and secure long after the initial build.
Frequently Asked Questions
Are pallets safe to build a chicken coop with?
Yes, as long as you use heat-treated pallets stamped HT and avoid any stamped MB, which are chemically treated. Choose clean, dry, undamaged pallets and seal the wood when finished.
How many pallets do I need for a chicken coop?
A small to medium coop typically takes eight to twelve pallets, plus a few extra to break down into boards for the door, roof, and trim.
How do I make a pallet coop predator-proof?
Seal every gap between slats with half-inch hardware cloth, bury or apron hardware cloth around the base, use locking latches, and add an automatic door for overnight safety.
How long does it take to build a pallet coop?
A motivated builder can complete a basic pallet coop over a weekend. Adding a run, painting, and fitting accessories may add a day or two.
Customizing Your Pallet Coop Design
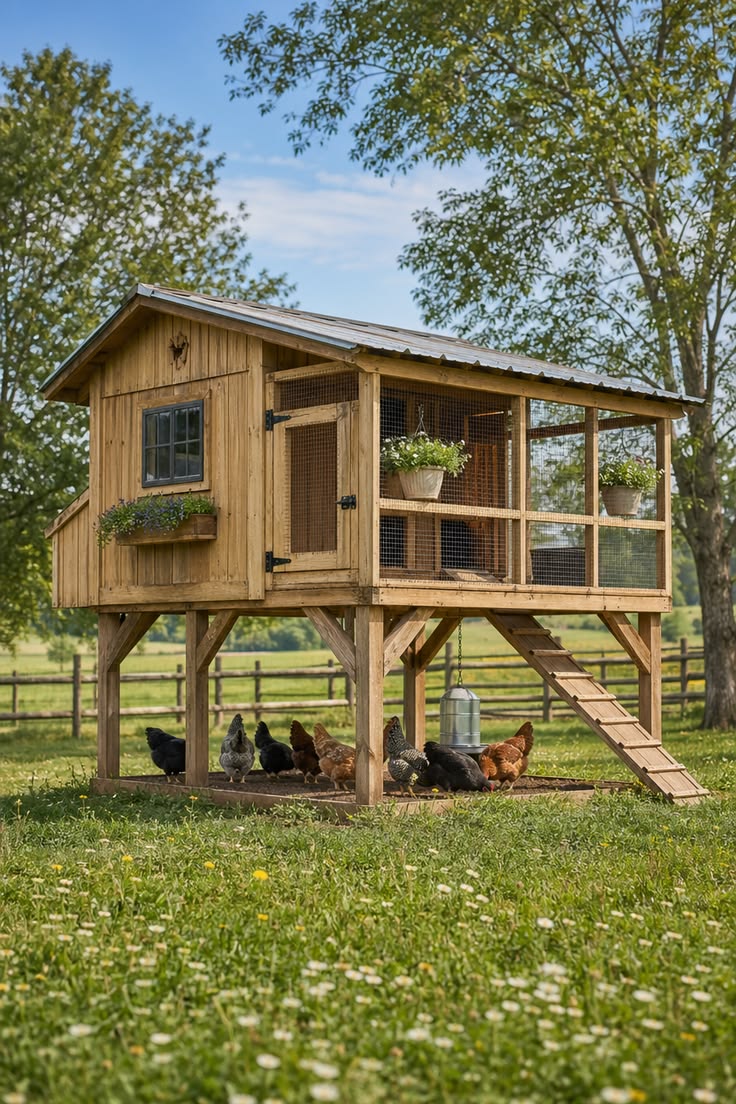
One of the best things about building with pallets is how easily you can adapt the design to your needs. Want a bigger coop? Simply add more pallets to extend the walls and floor. Prefer a raised coop for better predator protection? Mount the floor frame on taller legs or blocks and add a ramp.
You can build the whole structure as a compact tractor on wheels to move it around the yard, or expand it into a walk-in size for a larger flock. Add windows for light, a clean-out hatch for easy mucking, or an attached run for safe outdoor time.
Because pallets are modular by nature, you can start small and add on later as your flock grows, making a pallet coop one of the most flexible and forgiving builds for a first-time DIYer.
Final Thoughts
A DIY pallet chicken coop proves that you do not need a big budget to give your flock a safe, comfortable home. By choosing safe heat-treated pallets and following the four simple steps of base, walls, roof, and interior, you can build a sturdy coop that rivals expensive kits for a fraction of the price.
Seal the gaps, predator-proof the perimeter, and weatherproof the wood, and your pallet coop will serve your hens reliably for years. Grab the tools and hardware above, find some good pallets, and start building this weekend.